I am a huge fan of Yana Smakula and her cards. I saw her original card some time ago and thought “Wow this is awesome”. Glad I had the opportunity to try this technique.


Thank you for looking.


April 27th, 2020 klwade Posted in Cardmaking, cards, Crafts, mermaid, Online Card Class, onlinecardclass No Comments »
I am a huge fan of Yana Smakula and her cards. I saw her original card some time ago and thought “Wow this is awesome”. Glad I had the opportunity to try this technique.
Thank you for looking.
April 27th, 2020 klwade Posted in Cardmaking, Crafts, Online Card Class No Comments »
Today is using a stamp over a larger piece of paper and cut into two. I decided to use the Simon Says Botanicals. This ended up being taller cards so I could stretch it across both cards.


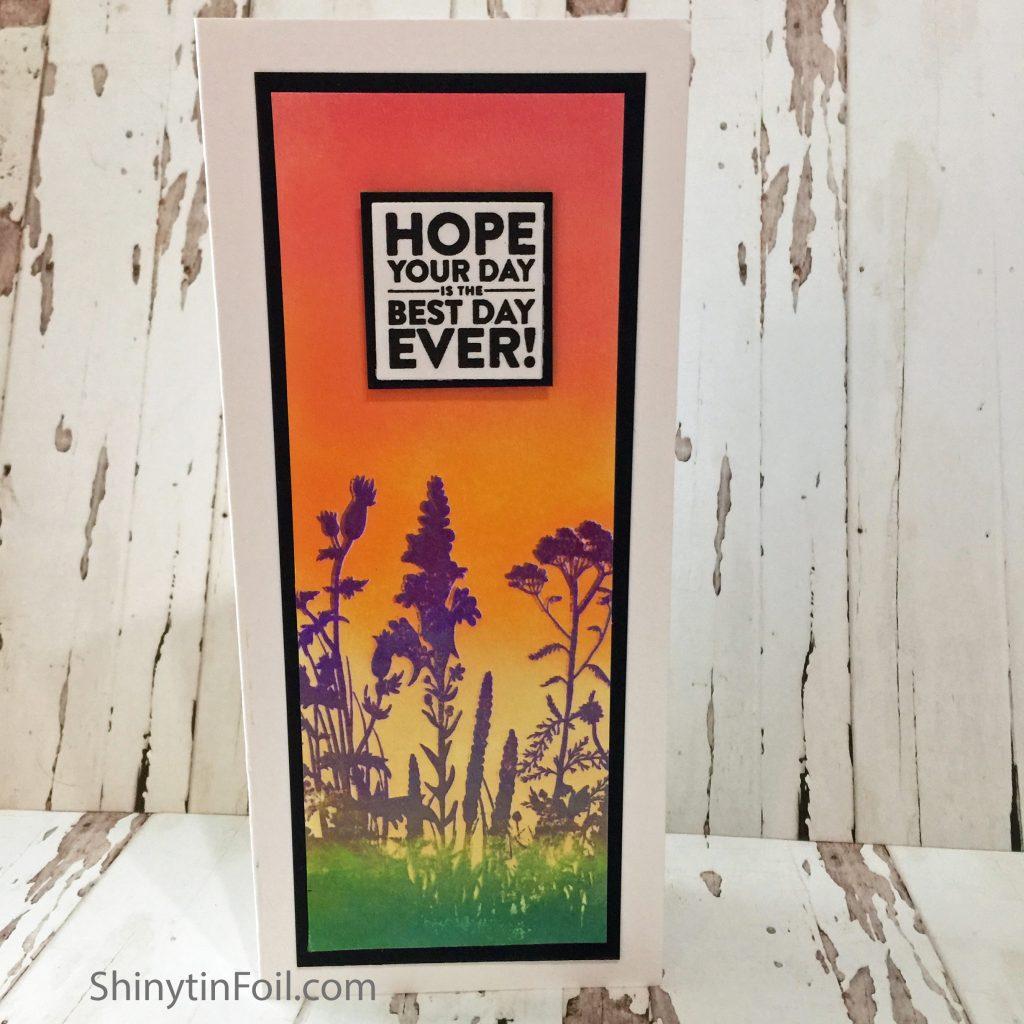
I ended up embossing the ink floral images because I wanted to color blend the background.
I liked what I planned but the color in the grass did not come out very good but overall I was pleased with the card.
Does it take anyone else 7 hours to make a card. Geez I am slow.
Thank you for looking.
April 27th, 2020 klwade Posted in Cardmaking, Crafts, Online Card Class No Comments »
Once again I have decided to take a card class. I have been falling behind in the card making and I was hoping this card class would inspire me to get into the mood and start cranking out card.
The first day of class is with Jennifer McGuire and faux embossing. I have not tried this technique before. Although I appreciate learning a new technique I really do not like it. Sorry. It looks kinda thick. But I do like the bunnies I used.


Thanks for looking!
August 10th, 2016 klwade Posted in Cardmaking, Crafts, Online Card Class No Comments »
I have always liked using stencils and playing with embossing paste. So this was a fun day for me.
I have a really bad head cold, so if I make a ton of spelling errors and write out strange sentences, forgive me.
Here are the tags from this day

This one was more fun than I thought it would be. It was very relaxing just pasting the images onto the cardstock.

For the card I decided to do a camping theme. I had the camping Ephemera so I thought it would be fun to do a card using them.

This was fun one. I could have done this all day. It was exciting to see all the different colors exploding on the background.

For the card I used my new starfish stencil. This picture does not do it justice. I painted a tiny starfish from the mini blueprints and added some fun do dads.

If I can use GOLD on anything I am happy. I really liked using the paste with embossing powder.

For the card I used a leaf stencil and used the leaf stamp and die cut to make the rest of the card.

You cannot see the gold very well in this pic, but this close up shows the shine.

This was such a cool technique. I love the tile look. I decided to use dark colors instead of the Picket fence. It was such a colorful print the white just did not show up.

For the card I used some paper I had in my stash. I cut the border out to make a frame and used one of the prints to make a mosaic for the middle. I thought it came out really cool. This was one of my favorite techniques.

This was an interesting technique. I think it was kinda fun and grungy. But the best part of this Lost Relative card, is that the dog looks like my Penny.


Just sayin!
I decided to do the snow technique for the card. It really does look like snow.

thanks for looking at my creations

August 10th, 2016 klwade Posted in Cardmaking, Crafts, Online Card Class No Comments »
Yikes! It has taken me a whole week to get Day two done. Tim does not mess around when it comes to teaching us techniques. He packs a full class.
Day Two is all about Distress Paint and Sprays

I have learned so much, and have made a mess of my craft area and have stained my fingers. LOL
I decided on this card to go for the Halloween look.

I have some older Anna Griffin stamps that had large words. This was perfect for the tag and card. I love the broken glass stsncil and it looks like a spider web.


For both the tag and card I used some valentine themed items. Not your traditional LOVE type cards, but it works for me. I dyed the ribbon to match the distress colors.

This tag and card was hard. I must have had this rubon for a million years. It was almost impossible to get onto the paper. I tried heating it. rubbing it. cursing at it. I finally got it to work. So glad I did not rip the paper.

I even dyed the cord with Distress Carved Pumpkin.

I liked the Mica spray. This spray can be addictive.

For the card I decided to used the Hero Arts Goldfish. I also added some bubbles with Glossy Accents.

Here is a close up.

I know I bought a Distress Marker Sprintzer but I could not find it anywhere. I finally had to buy a new one. I search everywhere. Finally a local store had it. I was sure the moment I got home the other one would show up. LOL.

I fought this spritzer tooth and nail. When I finally got the hang of it, I was pretty much done. It tends to move the marker to the side, so I was not getting any spray from the marker. Once I figured it out, it finally marked my paper.
Since I just bought the Tim Holtz Summer dies, I had to make a shaker card using the palm tree and the words.

Thanks you for looking at my creations.
August 4th, 2016 klwade Posted in Cardmaking, Crafts, Online Card Class 2 Comments »
I am a huge fan of Tim Holtz products. I love the distress line and the many things I can do with it. I learned a lot in his Creative Chemistry 101 and 102.
It was nice of Online Card Class to re-open the two older classes to allow people to relearn or sign up for the first time the other two classes.

There are so many techniques I would highly recommend that anyone take these classes.
My one complaint is that the class length should be two weeks instead of one. There are so many techniques to learn that is is impossible to keep up.
It is Day Four and I just finished Day One tags and cards. Maybe I do too much, but I really wanted to practice these techniques!
Oh well, onto the tags and cards.
Here are the tags for the five techniques.

I loved making my own ink pad. I was so excited when I brayered that color on the lid of the ink pad. Soooo pretyy. Nicer than I thought it would be.
I wanted a sunset color so I used Mustard See, Spiced Marmalade, Abandoned Coral and Seedless Preserves
 .
.

I used the Tim Holtz Butterflies to do the ombre effect. I had to rotate the stamp three times as I worked my way down the tag.

I got a little carried away with the card. I was using a new watercolor pen and it became obsessed!

I had such high hopes for this one. The first stamp set did not have enough “body” to make it stand out.

So for the card I used a solid stamp. Geez it took me forever.
Then it needed something and I splattered it with paint.
Now listen to me CAREFULLY! Practice first before splattering your project.
As this will happen to you!!!!

So we add some Nuvo drops on the card hoping you will not see the big brown blotches on the card. LOL
I liked this technique as it does remind me of antique cards

I used a older stamp set from Flourishes.org I was happy to see they reopened their shop again. They made the prettiest fruits and flowers.

I really like the Micro Glaze. Way cool. I had not heard of it before this class. Oh that Tim Holtz is always bringing us something to new to play with

Now for a little colorful shell
I made the ribbon by using the same inks that I used on the card

This one was a challenge as I did not have a lot of spray to choose from, but I liked the green and blues. Reminds me of the ocean.

I had fun with this card. I cut the tag into sections and used come glitter in-between the panels. I had this mermaid stamp set forever and never used it. It is hard to see but I added shimmer to the mermaid.

Well this was a good day one class.
 Posted in Word Art Wednesday Anything Goes Challenge #242-243
July 19th, 2016 klwade Posted in Cardmaking, Crafts, Online Card Class, Simon Says Stamp Card Kit 3 Comments »
Well it comes as no surprise to me that I have been so busy and not inspired to do any cards lately. However that does not mean that there are deadlines to upload images and new card kits coming. So get a move on girl!!! I decided to do the homework from the Online Card Class Heat Wave from the SSS July 2016 card kit, killing two birds with one stone. I had sketched out the ideas for my cards so it was easy to add the techniques from the Heat Wave Class to my ideas.

Take this kit……and add this class

and you get 7 cards from one kit.

First day of class taught us some basics on embossing as well as some interesting techniques. The following card is just simple embossing on watercolor paper.
I tried to get the illusion of leaves floating on some water. Very Zen like. Calm.

Also on the first day of class, they showed us several techniques. Some I tried, others I wanted too but did not have the time.
The first technique (which I have done before) is embossing a die cut.
In this card I used the paper from the kit that had a lot of triangles. I added additional triangles and heat embossed an entire die cut.

I used some WOW copper colored embossing powder. I stamped some additional triangles that were a scribble look and added some bling.
Here is a close up of the die cut.

Another technique they used was glitter embossing powder.
I copic colored the small panel underneath and then covered the whole thing with versamark and some glittery embossing powder.

It is hard to see how pretty the card looks with the shimmer over the copics.
The final card from day one was embossing on something besides cardstock. I decided to use wood veneer to make this card.

The wood cracked and split on the bottom thru the flower. I am not sure if the heat was too much for the wood, or if it was a user error. Most times it is me making a mistake. I still like the card. I think the stark white on the wood is very pretty.
On Day Two, Jennifer showed us some pretty techniques that can add detail to your cards.
I used the technique of a small strip of double sided tape and embossed it with pink powder.

I masked off the middle and stamped the flowers using a mask so the images did not overlap. I then colored the card with some colored pencils.
She also showed a technique of splattering water and embossing over the wet area.
I really like this technique. I took the paper that already had the purple splatters and added gold splatters.

She also did the technique of using a glue pen to make little dots to add additional embossing to fill out a space or enhance an image. I ended up doing that on the vellum window.

You can see the sequins captured behind the vellum to make this shaker card.
On the last day we learned about ironing off embossing powder to create a look. But the project that caught my eye was the batik looking card.
I used the stamp set to create a background and embossed in white. The after the fold and refold process I used three shades of purple distress ink.

I always ask my brother to rank the cards and this was his favorite. His logic: Today I like purple.
Overall I enjoyed the class and I liked this card kit.
I hope you enjoyed looking at my creations!
 Posted in the Online Card Class Heat Wave
Posted in the Word Art Wednesday Challenge #238-239 Anything Goes
Posted in the Simon Says Stamp Card Kit Gallery – July 2016
November 24th, 2015 klwade Posted in Cardmaking, Crafts, Online Card Class No Comments »

I was up for the challenge. I decided to use the same stamp set they did! I did buy it thinking I really would need it for the class. At first I was not sure I should because I was afraid my cards would look the same. But I am proud to say that only one looked similar. I love taking the inspiration and going for something different.

For this card I really wanted to use my embossing folder that gives that geometric look. I love it.

This card I really did a similar card to the instructor. I could not help myself as it was such a pretty card. I changed it up a little and I really liked how it came out.

For this challenge I used a barn die I had from Papertrey Ink. The little barn doors open to the Christmas Tree inside. I had a heck of a time finding a little wreath for the barn. I thought for sure Michaels would carry one since they have a ton of Jolie Stickers. The did have this cute beaded one from their own line Recollections. I did add a little cardinal to bring in the Christmas cheer. I think it came out cute.

I decided to emboss foil paper for the background and stamp on the shiny bell.

Well…..you know when you try to make a card and it just does not do it for you… this is the one. Something is just wrong with it. I don’t know what. Maybe I was tired. I did like the glittery embossing powder but that was about it. I guess I do not need to love all my creations!

Thanks so much for looking at my creations!
Please check out my Etsy Shop. I have a lot of my prior creations for sale. I am always adding more items to the store including goodie bags of scrapbook stuff.
November 24th, 2015 klwade Posted in Cardmaking, Crafts, Online Card Class No Comments »
Of course anything that says Shimmer & Shine has gotten my attention! Love it all~
I was able to buy some BoBunny glitter paste at my local Beverly Fabric. Like I said in my last post, I love going there. They always have the cool stuff…including this glitter paste. I got several colors because I was basically…you know…a kid in a candy shop. I had to have it all.
I decided to do a light blue cardstock with the Caribbean Glitter Paste. I just love the way it came out.

What is hard to see on this picture is that the side and the banner are the softest mat finish silver cardstock from Anna Griffin. I LOVE her glimmer/shiny paper. I would suggest you run, do not walk to HSN and order yourself a package a it. Currently they only have the soft hues pack, but they usually have a holiday one and at least one other. Her paper is sublime!!!!
Here is a close up of the paste

Just so pretty…
My next card, or should I say cards is using the foil shimmer technique.
I went to Michaels and they had this Craft Smith brand on sale. It was an entire pack of gold foil paper with different designs. Just awesome. It kinda looked like this but it was a 12×12 size with the same papers but with 36 pages. Not sure why I cannot find a copy of the paper pack anywhere on the internet. darn it. Oh well onto the card.

Here is the card set. I decided to do a trio. I could not decide which word die to use from this set of three dies and then I decided to just make the three cards.

Here is the Merry Card

And the Peace card

and the Holiday card

I added onto all three card the awesome deer heads from Little B. Yes, another great find at Beverly’s Fabrics.

I think I squealed when I saw this on the display…Must HAVE…NOW
I tied the card up with some Lawn Fawn Trimming (gold and natural cord)
Thanks for looking!
Also posted in the Simon Says Wednesday Challenge
![]()
If you have a chance, please check out my Etsy shop. I sell my cards and other fun things.
November 24th, 2015 klwade Posted in Cardmaking, Crafts, Online Card Class 1 Comment »
Day Three had so many pretty designs it was really hard to decide what type of card to do. I ended up doing two cards.
The first card was just something I was playing around with. Using glimmer paper and a pretty Anna Griffin die cut. I originally made this for the 1 Stamp 5 Ways challenge and then thought….CRAP-O I forgot to use the stamp set. Looking at this picture I realized I did….the sentiment…. Oh well at least I made a prettier card for the challenge.

The 2nd card this day was the Classic Shape Stamping technique from May Sukyong Park
This was her card.

I really liked the look of her card. So I tried to stay somewhat true to her technique

I had just ran to my local Beverly Fabrics, which by the way is soooo cool with their merchandise. They always have something new and exciting. They were actually carrying the Kelly Purkey cube inks. I got one of the sets and thought the colors would look good on this card…and it DID!!!! I also got the really cool Hero Arts stamp winter scene. It has the cutest little animals on it!

Don’t you agree??? It is such a cute stamp set…and I never even got to use the cute mason jars.
Here is a close up of the stamping.

Thank you for looking at my creations!
Also check out my Etsy shop! I usually sell my creations there if you are interested!