







Monochrome Raindrop Card

May 31st, 2016 klwade Posted in Cardmaking 7 Comments »

I saw on Papertrey Ink the Make it Monday Challenge #251 Gradient Watercolor die cuts and was inspired to try a card using my Zig Real Color pens.

I have the Papertrey Ink Rainy Day cover up die and was thinking wonderful blue raindrops would look great.   Also the Simon Says Monday challenge was to make a Monochrome project.  This card fits the bill for both.


Raindrops on head


Although  this was very simple to make using water color paper and Zig Real Clean Color markers, it was harder to keep the raindrops in the card so I can line them up on the card.  I finally had to use the negative space card to use as a template and glue each of the drops in place.   I then used some of my favorite raindrop gems on the card to give the additional feel of rain.   Finally just a simple sentiment from the rainy day sentiments stamp set which was embossed in white.


Here is a close up of the card where you can see the gradient of color better on the drops.   I really like the gemstones, I think it adds just the right about of bling to the card.


Raindrops on head close up

Thank you so much for looking at my card!


Supplies:

Papertrey ink Cover Plate Rainy Day
Papertrey Ink Rainy Day Sentiments
Zig Real Color Pens
Pretty Pink  Posh rainstones
Simon Says White Embossing Powder
Neenah Solar White Cardstock
My Favorite Things Lush Lagoon Cardstock

Simon Says Stamp Monday Challenge BlogPosted on the Simon Says Monday Challenge


5 Cards from 1 Kit – Simon Says Stamp June 2016 Card Kit

May 28th, 2016 klwade Posted in Cardmaking, Simon Says Stamp Card Kit 3 Comments »

Ok I am guilty.  Very Guilty.   I am guilty of “buy the kit and do nothing with it – itis”

I subscribe to the Simon Says Stamp monthly card kit.   And the kits just sit in their boxes.  Sad little brown boxes, just wanting to be made into fantastic cards.

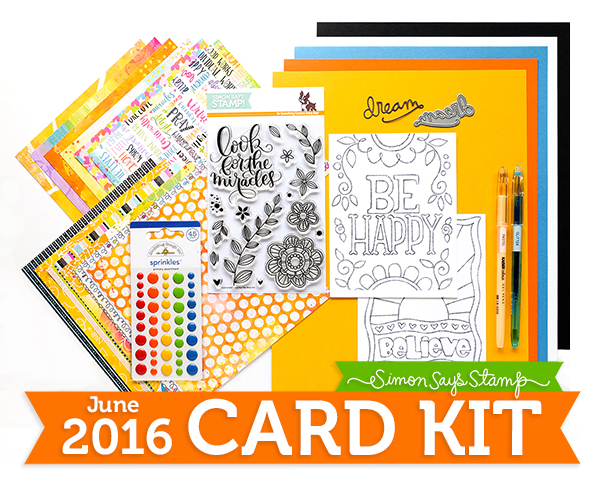
So I decided to get off my butt and commit to making at least 5 cards from one kit.  So grabbed the current kit, the June 2016 kit.  To be honest I was not that thrilled with the colors of the kit, but I loved the stamp set.  I also loved the coloring cards.   I have to admit,  I am seriously crushing on Suzy Plantamura and her adorable drawings.  I actually went to Simon Says and bought the sets.  Here is her newest one.

Simon Says Stamp SUZY'S WATERCOLOR EVERY OCCASION NOTES Water Color Paintable Prints My Favorite SPE12 zoom image

Doesn’t this make you want to sharpen your colored pencils.

Ok, to get back on track.  Here is the kit for June 2016

June 2016 Card Kit 600


Simon Says Clear Stamps LOOK FOR THE MIRACLES SSS101607 zoom image


So my first two cards are made from the cute coloring card fronts from the kit.  It was  great paper to use copics on.  On a side note, I almost have all the copic colors.  I have been collecting them for a long, long time.  I just wish there was a better storage solution.  I did check out Sandy Allnock’s post on copic storage and it did give me some ideas.   You can check out her post here.  I am seriously thinking of the new suitcase, but back to the cards.

Be Happy

Besides using copics, I used a white gel pen to add some dots.

Believe

I decided to make this a shaker card.   The body of the sun was just begging to be made into a shaker.  I also used some zig glitter pens to the sun rays, you can see it better in this closeup.

Believe closeup

Next I wanted a card that has some elegance.   I decided to emboss on some gold vellum with the new Simon Says stamp Rose Gold Embossing powder.   I also used the same embossing powder for the “dream” die cut.   The glitter strips were from Anita’s 3D Border Glitterations.  She has some cute stuff and I thought this puffy glitter strip was just perfect.   I recently went to the CKC Expo in Mesa Arizona and found some orange colored Twinkle Goosebumps that matched perfectly.

Dream Flowers

For my next card I wanted to use the Look for a Miracle stamp.   I water colored the card front with some pinks, green and yellows.

Look for Miracles

For my final card I wanted to use the pretty rainbow type paper, but I could not think of design that was not overwhelming in colors.   I finally decided to do a die cut that showed the pretty color underneath.  I actually like how this card came out.

Rainbow Flowers

I hope you enjoyed my cards.   I really enjoyed challenging myself to come up with some designs.


Posted in the Simon Says Stamp Wednesday Challenge Blog

Simon Says Stamp Wednesday Challenge Blog

OCC Holiday Style – Day 11 One Stamp Five Ways Challenge

November 24th, 2015 klwade Posted in Cardmaking, Crafts, Online Card Class No Comments »

I was up for the challenge.   I decided to use the same stamp set they did!   I did buy it thinking I really would need it for the class.  At first I was not sure I should because I was afraid my cards would look the same.  But I am proud to say that only one looked similar.   I love taking the inspiration and going for something different.

Challenge #1 – Clean and Simple

For this card I really wanted to use my embossing folder that gives that geometric look.  I love it.

DAy 11 - Clean and Simple copy


Challenge #2 – Classic and Elegant

This card I really did a similar card to the instructor.  I could not help myself as it was such a pretty card.  I changed it up a little and I really liked how it came out.

DAy 11 - Classic and Elegant copy


Challenge #3 – Cute and Whimsical

For this challenge I used a barn die I had from Papertrey Ink.  The little barn doors open to the Christmas Tree inside.  I had a heck of a time finding a little wreath for the barn.  I thought for sure Michaels would carry one since they have a ton of Jolie Stickers.  The did have this cute beaded one from their own line Recollections.  I did add a little cardinal to bring in the Christmas cheer.  I think it came out cute.

Day 11 - whimiscal copy


Challenge #4 – Shimmer and Shine

I decided to emboss foil paper for the background and stamp on the shiny bell.

Day 11 - Shimmer and Shine copy

Challenge #5 – Soft and Subtle

Well…..you know when you try to make a card and it just does not do it for you…  this is the one.   Something is just wrong with it.  I don’t know what.  Maybe I was tired.   I did like the glittery embossing powder but that was about it.  I guess I do not need to love all my creations!

Day 11 - Soft and Subtle copy

Thanks so much for looking at my creations!

Please check out my Etsy Shop.   I have a lot of my prior creations for sale.  I am always adding more items to the store including goodie bags of scrapbook stuff.


OCC Holiday Style – Day 7 Shimmer and Shine

November 24th, 2015 klwade Posted in Cardmaking, Crafts, Online Card Class No Comments »

Of course anything that says Shimmer & Shine has gotten my attention!  Love it all~

I was able to buy some BoBunny glitter paste at my local Beverly Fabric.  Like I said in my last post, I love going there.  They always have the cool stuff…including this glitter paste.  I got several colors because I was basically…you know…a kid in a candy shop.   I had to have it all.

I decided to do a light blue cardstock with the Caribbean Glitter Paste.  I just love the way it came out.

Day 7 Glitter Paste copy

What is hard to see on this picture is that the side and the banner are the softest mat finish silver cardstock from Anna Griffin.  I LOVE her glimmer/shiny paper.  I would suggest you run, do not walk to HSN and order yourself a package a it.  Currently they only have the soft hues pack, but they usually have a holiday one and at least one other.   Her paper is sublime!!!!

Here is a close up of the paste

Day 7 Glitter Paste close up copy

Just so pretty…


My next card, or should I say cards is using the foil shimmer technique.

I went to Michaels and they had this Craft Smith brand on sale.  It was an entire pack of gold foil paper with different designs.  Just awesome.  It kinda looked like this but it was a 12×12 size with the same papers but with 36 pages.  Not sure why I cannot find a copy of the paper pack anywhere on the internet.  darn it.  Oh well onto the card.


Here is the card set.  I decided to do a trio.  I could not decide which word die to use from this set of three dies and then I decided to just make the three cards.

DAy 7 - Foil Shimmer trio copy

Here is the Merry Card

Day 7 - Shimmer Merry copy

And the Peace card

Day 7 - Shimmer Peace copy

and the Holiday card

Day 7 - Shimmer Holiday copy

I added onto all three card the awesome deer heads from Little B.  Yes, another great find at Beverly’s Fabrics.


Day 7 - Shimmer deer closeup

I think I squealed when I saw this on the display…Must HAVE…NOW

I tied the card up with some Lawn Fawn Trimming (gold and natural cord)

Thanks for looking!

Also posted in the Simon Says Wednesday Challenge

wed-challenge-badge_zpsf506d7ee


If you have a chance, please check out my Etsy shop.  I sell my cards and other fun things.


OCC Holiday Style – Day Three Classic and Elegant

November 24th, 2015 klwade Posted in Cardmaking, Crafts, Online Card Class 1 Comment »


Day Three had so many pretty designs it was really hard to decide what type of card to do.    I ended up doing two cards.

The first card was just something I was playing around with.  Using glimmer paper and a pretty Anna Griffin die cut.   I originally made this for the 1 Stamp 5 Ways challenge and then thought….CRAP-O I forgot to use the stamp set.   Looking at this picture I realized I did….the sentiment….   Oh well at least I made a prettier card for the challenge.

Day Two - Holly Leave copy

The 2nd card this day was the Classic Shape Stamping technique from May Sukyong Park

This was her card.


Classic Shape Stamping

I really liked the look of her card.  So I tried to stay somewhat true to her technique

DAy 3 - Shape Stamping copy

I had just ran to my local Beverly Fabrics, which by the way is soooo cool with their merchandise.   They always have something new and exciting.  They were actually carrying the Kelly Purkey cube inks.   I got one of the sets and thought the colors would look good on this card…and it DID!!!!  I also got the really cool Hero Arts stamp winter scene.  It has the cutest little animals on it!

Don’t you agree???   It is such a cute stamp set…and I never even got to use the cute mason jars.

Here is a close up of the stamping.

DAy 3 - Shape Stamping Close up

Thank you for looking at my creations!

Also check out my Etsy shop!  I usually sell my creations there if you are interested!

Soft and Subtle Cards – Day 9

November 18th, 2015 klwade Posted in Cardmaking, Crafts, Online Card Class 3 Comments »

Tis the Season….     Of making cards even thou you do not feel like it.  I had to force myself to make a card tonight.


I really like the way Michelle Short made her card.   It was so clean and simple that I was inspired.

michelle shrot card

Of course I had to muck it up with stuff.   I wanted to background to look like the Aurora Borealis.

Ok, I was close, not quite.   Then I wanted more trees.  So I got trees.  With a little help of Zig glitter pen I enhanced the tree.     My inter creative person was screaming…STOP, STOP…you are doing to much.  Thank God I listened to her.   It is a little busy but I do like the look of it!!!

shimmer trees copy

Thanks for looking!!!!

wed-challenge-badge_zpsf506d7ee

Cute & Whimsical Cards – Day 5

November 13th, 2015 klwade Posted in Cardmaking, Crafts, Online Card Class 13 Comments »

Holiday Style

This day is all about making cute cards with critters.  I have a lot of critter stamps so this was super easy to do.

Caroling Rabbits copy

I ended up doing this card in sections.

First of all I ink blended the background, covering the lamp glow with a post-it note.   It kinda looks like a moon, but I think you get the idea that it is the lamp glowing.

Then I stamped a Christmas Music Sheet on the background in versamark.  You can kinda see it in the close up.  I wanted the feel that the rabbits were caroling.   I also used Glossy Accents in the lamp shade to give the illusion of glass.

Caroling Rabbits Close up

The I added the hills and the rabbits.  And the sentiment.

I finally added snow from modeling paste.  I was ok with the snow falling on the critters and the lamp because that would happen in real life.  I am sure if you saw three bunnies caroling in the snow you would see the snow fall on them.  Please let me know if you actually see three bunnies caroling, better yet, take a picture.

Then I added some snow under the bunnies (not so sure I like this).  Then I added some music notes.

I hope you enjoyed my card.  Thanks for looking.

Please check out my Etsy site.  The button is on the left hand side.


Classic & Elegant Cards – Day 3

November 13th, 2015 klwade Posted in Cardmaking, Online Card Class 1 Comment »

Holiday Style

Day three had a ton of great ideas for making cards to look elegant.    I was in awe of all the pretty choices and boy were they diverse in style.  Instead of taking inspiration from one card in particular, I decided to just go with the flow and find my own class and elegant look.

I started out with a beautiful gold shimmer card stock.  God Bless Anna Griffin for making such beautiful shimmery card stock.   I wish all the others would take note and do the the same.  I cannot, I repeat, cannot get enough of shimmer metallic card stock.

Then I took an beautiful die from Memory Box called Swirling Snowflakes to create a white snowflake overlay.   Then using Papertrey Ink Christmas Cheer Die I cut out a white card stock and glitter paper (Tim Holtz) and offset them together to create the center of the card.   To let it stand out more, I placed a band of vellum across the card.  I finished with some sequins.

Just a note on the Papertrey Ink Christmas Cheer Die.  I love, love, LOVE the retro style, 1950’s style writing of this die set.  Thanks so much Papertrey Ink.  Please feel free to design more word dies with this awesome font.  I just cannot get enough of it.


Let it Snow copy

Thanks for looking!


Please check out my Etsy shop, I am selling a lot of my cards!


Clean and Simple Cards – Day One

November 13th, 2015 klwade Posted in Cardmaking, Online Card Class 1 Comment »

So excited to be enrolled in another Online Card Class.  I learn so much and it really pushes my crafting ability.

The classes for day one is able clean and simple cards.


The very first card was from Julie Ebersole.  She always does such classic looks in such simple techniques.


CAS Card Julie Ebersole

I took her inspiration of creating a frames scene with beautiful trees and snow.

I decided I did not want to make the lines around the picture so I ended up ink blending the edges with a blue sky.   I did not have a glue pad so I ended up using modeling paste and sprinkled glitter on it.

I really like how this card came out.

SEasons Greetings in Trees copy


Make sure you check out my Etsy shop  (see button on the right) as I am selling off a ton of my creations.

Thank you looking!!!!

Papertrey Ink Make it Monday #229 – Fabric Strip Christmas Trees

November 8th, 2015 klwade Posted in Cardmaking 1 Comment »

Papertrey Ink’s Make it Monday for this week was making a fabric strip christmas tree.


Mimoctober_meliphillips1


Although pretty, I was thinking retro, like the Christmas tree my Grandmother use to have.  A Tinsel one.   I thought it would be cool to have an all tinsel tree but in soft pastel colors.

This is similar to the tree my Grandmother had, including the color wheel that made the tree sparkle with different colors.


To get the base of the tree I took a straw and covered it with metal tape used for plumbing.  This way the base was all silver

To make the tree, I used some tinsel ribbon.  It was strange ribbon as it had two rows with little brackets every few inches, but it worked.

The original tinsel ribbon was silver, but I took a variety of Alcohol Inks to color the tinsel.   The colors came out a muted, retro color.

Then I tied them onto the straw.  After that I trimmed the tree to be more tree shaped.    I decided to use a silver foil background.  I used the Papertrey Ink Holiday Plaid paper.  They actually had a muted one that matched the colors of my inks.   Can you say lucky!!!

I then placed a foam cushion behind the silver rectangle to give it some dimension.   I then glued a Tim Holtz Idealology Star to the top.   The card base is made from Papertrey Ink Aqua Mist paper.

Sadly this picture does not do it justice.  The lighting is really bad today.


tinsel tree card copy


Thank you for looking at my card.

I will be selling it shortly on Etsy, but in the meantime, please click on the etsy button on the right to see the cards I currently have on sale.

Thanks so much!