


Well I did it. I actually started and COMPLETED a December Daily. I tried many, many years ago when Ali first started her December Daily. I bought her kit, I printed some pictures. And then I froze. I tried to emulate her album. I struggled. I gave up.
Fast forward many many years later. I have more confidence in my scrapbooking and my creativity.
I watch Ali’s videos on her blog and found inspiration. This is my December Daily album for 2016
My theme this year is Old time memories.
The Cover
Since I started this process mid December I discovered that all the pretty albums out there were gone. The beautiful one from Ali Edwards was gone…gone…gone…
I have discovered that not many folks out there make a 6×8 album. What the heck. Come on people….make cute albums…. pretty please.
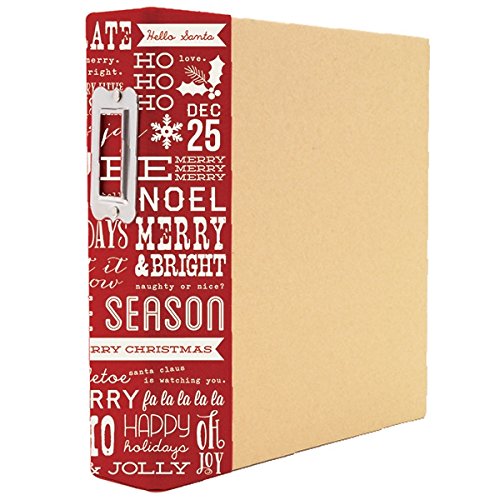
I did find a Christmas type album on Amazon from Simple Stories. I noticed on Pinterest that I am not the only one who got this album. But I have to admit it is cute.
A plain chipboard album cover with Christmas Subway Graffiti on the binding. And the color is bright red. Love it.
I started out using Daily Flash pocket holders from October Afternoon as I liked the configuration. But I was surprised to find out the binder rings do not line up. Sigh! Why is everything so hard. Ugh. On a side note, the same thing is happening as I try to figure out a planner I want to use. I love the Webster Pages binder and the Papertry Ink inserts. No clue if they fit each other. No clue. So sad, but I digress!!!
So I covered the album with some October afternoon wood like paper and added a red glittered Believe from Tim Holtz and An oldy but a goodie from Quickutz, the No73 die set.


On the inside front and back panels I used some October Afternoon old advertisement print.

So let’s get started!
Opening Page
I wanted a statement piece to start out my album. But I could not find anything to add, so I made my own die cut from the Cricut. I then added stars and some snow. Ok, I am sure you said it out loud, “Dang she used too much glitter stuff in that sleeve”. I know…I know….

You can copy my file for your own use. It is a PNG file.

DAY ONE
One the next page I added DAY ONE.
The Song for this Album is White Christmas. I printed the lyrics on a photo and washi taped it to the page protector.

When you lift the picture, you can read page one journaling.

The glitter does not look too bad at this last page. LOL.
INTENTION PAGE AND CUT FILES
Because I purchased a few items for cut on my cricut.
You can purchase these cutting files HERE
I wanted to add some to my book. The first is a deer head where you can read the words of the following page. You can see the words from my Intentions page.

From the other side you can see the lyrics from the White Christmas picture on Day One.

Here is the Intention Page. I had mentioned that the Intention for this year was old time memories of my childhood and Christmas in the past. I explain that in detail on this page.

CALENDAR AND DAY TWO
On Pinterest I found a wonderful blogger named Marie from Stitch in Time. She makes the most incredible pages. She even designed three cute retro calendars for all us peeps out there who need a calendar for our Daily December.
You can find her blog here
I used the red retro snowman calendar and filled in the important things in December in the calendar.
On the opposite page I did day two.
If you know me, you know it is all about my animals. I never married and never had children. So the critters are my little ones.
The dogs got their Christmas collars to wear. These are from PetSmart, the Martha Stewart line. She does the cutest collars, especially for Christmas and Halloween. They go fast in the store so I have to buy them early.

Here is a close up of the Day Two tag.

Forgive the glare on these pictures, still trying to master the photography.


